I recently made a downloadable template on deviantArt , so I thought I'd make a tutorial, in case people need help finding their way through the scary jungle that is animating in photoshop.
I'm using Photoshop CS5 on a mac, but it should work more or less the same on any Photoshop and OS's.
So here we are, let's get started! (click on the images if they are too small to see)
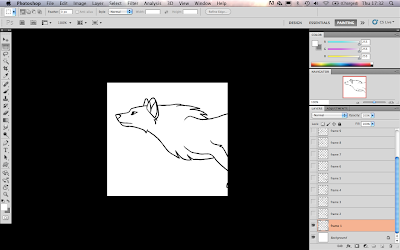
First, when you open your template, you'll see something like this...

(I'm using the half-version (har har literally har har) so no one will steal my precious frames. But it works JUST the same, so never fear.)
So, first off, you'll need the animation-window in photoshop... This will show you the animation, as frames. To open it, click Window>Animation.
You should now get something like this:
(Notice the window at the bottom.. This is the timeline, and every box is a frame.)
If your window looks different, with a long weird green bar and whatnot (I don't know myself), like this:
Just click the little timeline-button in the bottom right of the same window.
(If you don't get the weird green bar, you're fine, don't click the button, just move on)
If you click the little Play-button on the bottom left in the window, you can see the animation! yaaaaaaaaaaaaaaaaay.
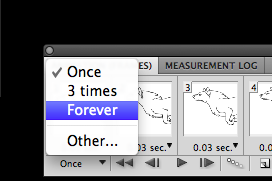
However it might stop after every time you play it, which is annoying. But you can make it run forever, in an endless loop, if you use the dropdown-menu to the bottom left in the animation-window.

Choose FOREVEEEER
watch it run and rund and run. Click the stop-button whenever you feel like it.
Next, lets get colouring this mutt.
You CAN draw straight on the art with the layer on it, but that's really not recommended. Let's make a layer for the colour. And yes, you'll have to colour every frame seperately.

As you see, the layer called "frame 1" is the only layer visible on frame one in the timeline. If you select the different frames, you'll see what layers are visible. If you select the second frame in the timeline, the layer called "frame 2" should be visible. To make layers visible/invisible, click the little eye to the left of the layer.
HERE'S A BIG TIP FOR YOU WHO ARE AS LAZY AS ME: If you think 12 frames is a lot to colour, just cut out every second frame, and use half the frames. Select frame 2, 4, 6, 8, 10 and 12 on the timeline, and drag them to the little bin-symbol on the bottom of the animation-window.
(your wolf will be running a lot faster now, so you might want to slow down the framerate. I'll talk about how to do this a little later.)
Let's move on to colouring. As you see in the last window, I've made a layer under frame 1 and called it colour1. You can call it whatever you want, but it's nice to know which frame it belongs to (thereof the number 1). let's splash some colour on this picture...
plop. But wait, what is this?? When you try and play the animation now, the colour is visible on all the frames! WHAAT THE FLIP
Don't worry, that's easy to fix. You see, every time you make a new layer, that will become visible on ALL the frames! Don't ask me why, that's just the way it is. I suggest you select all the frames, make the layer with the colour on it invisible. THEN, select the frame you just coloured, and make the colour-layer visible again.
IT STILL APPEARS ON ALL THE FRAMES??
Well, that is probably because you are on the first frame. The first frame is like a master-frame, so if you change something on that, ALL the other frames will change too.
Ughhh, I know, it's stupid. So you'll have to be careful.
Just make frame 1 right, then select all the other frames and make the unwanted layers invisible. make the colour-layer invisible again. ok. Now it should work. If it doesn't, just play around until it's right. It'll make sense after a while.
NOW!
Keep making layers and adding colours...
I suggest you make a colour-layer for all the frames straight away (make sure the colour-layer is always under the line-art-layer, or else things will turn weird), then select frame one and make all the new colour-layers invisible. This way you can select the frames you want, when you want, and make the colour-layer that belongs to it visible as you go.
so the layers would be like this:
frame 3
colour 3
frame 2
colour2
frame 1
colour 1
and so on.
And the layers 'frame 1' and 'colour 1' will be visible on frame one in the timeline.
And the layers 'frame 2' and 'colour 2' will be visible on frame two in the timeline.
It kinda makes sense, right?
50 YEARS LATER
Make sure the layers that are supposed to be visible on this and that frame is visible when it's supposed to, and... that's it! You're pretty much done!
You can keep adding layers, maybe another colour-layer, or if you even want to add a scarf or hair, or legwarmers or shoes or horns or claws, you can do that as well! But your layers might become a mess, so I suggest you put things into folders. So everything on frame is in it's own folder, and everything that's in frame two is in another folder, etc.
Ok. Now, before we move on to saving this beauty...
Let's set the framerate.
This animation fits well for 24 frames per second, so let's make every picture show for about 0.04 seconds.
Select all the frames (click first frame, hold shift, click the last frame) and click on one of the little numbers on the bottom of the frame (it already says 0.04 on this picture, but might not on yours).
Select "Other", and a box should pop up. Enter "0.04" and click ok. Now, if you play it, it should run at 24 fps! smooooth...
If you earlier did as I suggested, and deleted every second frame, you might want to decrease the framerate to 12 frames per second. If so, just enter "0.08" instead of "0.04".
You can also make it run at 12 fps if you simply want your wolf to run slower.
It's kinda nice, right? I think I prefer this one, to be honest. It's not as smooth, but it makes the movement a lot easier to look at.
And here's how it will look with half the frames cut, on 12 fps (0.08 sec per picture)
It's not as smooth, but it makes it twice as fast to animate!
OK! Last step! It's time to save this thing.
Go to File > Save for Web & Devices
And you'll get a big window popping up, looking something like this:
There are many ways to save the gif, but I use these settings. You can play around with the settings (it MUST be a gif though, or it won't be animated) and see how it affects the colours, appearance and filesize.
Click save, choose a location aaaaaand
YOU'RE DONE!
HURRAAAAAAAAAAAAAAAAY
Thank you for using this tutorial! If you have any questions, leave them in the comments below.
Please consider buying the template as well as I'm in need of some pennies, and if you're new to animating in photoshop, it's a great way to get started! THANK YOU!


Ingen kommentarer:
Legg inn en kommentar